Are you tired of watching your champion fall off in teamfights? The answer lies in understanding how to construct your items properly. This priestess thrives on close-range combat and regeneration, which means your build path needs to emphasize survivability while maintaining damage output.
What makes this champion unique is her reliance on tentacle spawns and her test of spirit ability. Unlike traditional bruisers who rely solely on raw stats, she benefits from specific items that synergize with her kit. The meta has shifted considerably in 2026, and what worked last season might not cut it anymore.
Your journey to mastery begins with understanding the fundamentals. Every item you purchase should serve a purpose—whether that’s increasing your fighting potential, improving your survival rate, or enabling your team’s victory conditions.
Illaoi Build Breakdown
Breaking down a build means understanding each component’s role in your overall strategy. Think of it like constructing a foundation before building a house—the order matters, and the materials you choose determine everything that comes after.
The standard approach involves three phases: early game survival, mid-game dominance, and late-game scaling. Each phase requires different itemization priorities. Your first back should always focus on establishing lane pressure while staying healthy enough to trade with enemies.
Why does build order matter so much? Because purchasing the wrong items at the wrong time can cripple your effectiveness. A player who understands timing can spike in power and secure objectives, while someone rushing items without purpose falls behind permanently.
The beauty of this champion is flexibility. You’re not locked into one specific path. Depending on enemy composition and how your lane unfolds, you might prioritize armor earlier or push for damage. The key is making informed decisions based on what you’re facing.
Best Illaoi Build for Top Lane
When we talk about the optimal itemization strategy, we’re looking at the path that works in the majority of matchups. The best approach combines early game pressure with mid-game teamfight dominance.
Start your journey with Doran’s Blade and a health potion. This gives you the sustain and damage needed to bully opponents in the first ten minutes. Your goal is establishing presence immediately, forcing enemies to respect your threat level.
Your first item completion should be Sundered Sky. This item represents the biggest power spike available. Why is this essential? Because it grants you three crucial elements: damage, health, and survivability. The passive applies to your spirit’s attack, meaning your poke damage doubles with this single item.
After securing Sundered Sky, move into Black Cleaver. This item shreds enemy armor, amplifying all your damage output. Against health stackers, this becomes even more valuable. Your tentacles benefit from the armor reduction, making your entire kit stronger.
Your third major purchase should be Sterak’s Gage. This item transforms you into a teamfight powerhouse. The shield it provides, combined with your existing health pool, makes you extremely difficult to burst down. The tenacity also helps you stick to targets.
Next, acquire Death’s Dance. This item serves a critical role—it converts burst damage into damage over time, giving you moments to fight back. Combined with your sustain, you become nearly unkillable in extended engagements.
Finally, grab Spirit Visage as your magic resist item. The healing increase synergizes perfectly with your damage reduction items, creating a multiplicative effect on your survivability.
Throughout your build, prioritize Mercury’s Treads over other boot options. The crowd control reduction is invaluable, allowing you to position aggressively without fear of being locked down.
Illaoi Runes for Optimal Build
Your rune setup determines your survivability and damage output before items even matter. Many players overlook this aspect, but it’s equally important to itemization.
Choose Grasp of the Undying as your primary keystone. This rune provides health, damage, and sustain—three things this champion desperately needs. Every trade you win heals you and strengthens your health pool permanently. It’s the perfect synergy with a tankier build approach.
Your secondary rune tree should be Resolve. Take Conditioning for the armor and magic resist scaling. At 10 minutes, you gain two permanent stats, making your survivability better the longer the game extends. This complements your itemization perfectly.
Consider Second Wind as an alternative if you’re facing poke-heavy matchups. Against champions like Teemo or Cassiopeia, the extra healing from incoming damage keeps you healthy enough to continue fighting.
For your tertiary runes, take Attack Speed or Adaptive Force depending on your preference. Most players benefit from attack speed since your basic attacks trigger your passive and enable your combo potential.
Bone Plating should be considered if you’re facing all-in matchups. Champions like Darius or Renekton use short burst windows to eliminate you. Bone Plating reduces their damage significantly during these critical moments.
Don’t sleep on the precision secondary tree either. Triumph and Tenacity provide teamfight value that pure tankiness doesn’t offer. If you’re planning to be the focal point of fights, these runes help you survive longer.
Your rune choices should adapt based on enemy composition. Against AD-heavy teams, stack armor. Against AP threats, prioritize magic resist early. Flexibility is strength at higher elo.
Illaoi Items and Build Path
Understanding every item available helps you make better decisions when adapting to unique situations. Not every game plays out identically, and your itemization should reflect that.
Sundered Sky is universally considered the best first item. The combination of damage and health makes it unparalleled for this champion. You become harder to kill while your damage output increases dramatically. Against specific matchups like Ornn or K’Sante, you might consider rushing something else, but generally, this item wins games.
Black Cleaver synergizes with everything. It shreds armor, helps you kite enemies through the movement speed passive, and scales with health purchases. Every single stat it provides matters for your kit.
Sterak’s Gage prevents one-shots. In a meta where burst damage dominates, this item keeps you alive long enough to counter-strike. The shield scales with your health, so it gets stronger as you purchase more health items.
Death’s Dance changes how you interact with fights. Instead of dying from burst, you take the damage over three seconds. This window is often enough to win the fight through sustain and damage output.
Spirit Visage increases healing effectiveness by 25%. Combined with your items and rune choices, this creates exponential survivability. You’re not just gaining magic resist—you’re amplifying your sustain simultaneously.
Are you wondering when to deviate? Consider these alternatives:
Kaenic Rookern provides magic resist while applying grievous wounds to enemies. Against heavy healing teams, this might replace Spirit Visage.
Force of Nature offers movement speed alongside magic resist. If you need kiting potential more than raw survivability, this works.
Maw of Malmortius provides a shield alongside magic resist. Against bursty AP threats, this prevents one-shots more effectively than pure MR.
Randuin’s Omen helps against critical strike builds and provides armor. Against Tryndamere or Caitlyn, this becomes necessary.
Titanic Hydra offers another damage option if you’re ahead. The active ability helps wave clear while providing health scaling.
Hollow Radiance combines armor, magic resist, and aura stats. In Aram modes, this becomes significantly more valuable than in solo queue.
Illaoi Starter Items
Your beginning items determine your early game trajectory. Getting this right gives you the foundation for success.
Doran’s Blade provides health, attack damage, and lifesteal. This combination makes you tough to duel while enabling early damage. Most matchups favor Doran’s Blade simply because it provides everything you need.
Dark Seal offers a different approach if you’re playing into a scaling matchup. The ability power isn’t your primary stat, but the health and mana regeneration help. Only consider this if you’re significantly ahead already.
Corruption Potion gives sustain and mana regeneration. Against poke champions, this extra healing keeps you in lane. However, it doesn’t provide damage, making it inferior for trading scenarios.
Most of the time, Doran’s Blade wins. It enables you to be aggressive while staying healthy, which is your primary goal in the first ten minutes.
Illaoi Early Game Items
What you purchase after your first back determines whether you maintain advantage or fall behind. Timing and decision-making matter enormously.
If you’re planning to rush Sundered Sky, your first back should involve purchasing Spectre’s Cowl if they have AP threats, or another Doran’s Blade if you’re even in the matchup. This accelerates your first item completion.
Caulfield’s Warhammer synergizes with Sundered Sky’s build path. The ability haste helps your combo come off cooldown faster, and the attack damage adds to your early trading potential.
Spectre’s Cowl should be prioritized if their jungler has AP damage or if their mid laner is scaling into your problem. Getting this early prevents mid-game burst sequences.
Plated Steelcaps become necessary if you’re facing critical strike builds or pure AD lanes. Champions like Tryndamere demand this purchase.
If you’re dominating your lane, consider pushing your first item completion faster by stacking damage items. Sometimes the best defense is offensive pressure that prevents enemies from executing their strategy.
Illaoi Core Build Items
Your core three to four items define your power level. These are the purchases that transform you from useful to oppressive.
Sundered Sky followed by Black Cleaver creates your damage core. With these two items, your trading pattern becomes overwhelming. Enemies struggle to compete with your raw damage output amplified by armor shredding.
Adding Sterak’s Gage creates your tankiness component. Now you’re dealing respectable damage while being nearly impossible to assassinate. This three-item combination represents the sweet spot where you can 1v3 most team compositions.
Death’s Dance extends your survival window. Instead of dying instantly to burst, you fight back effectively. The damage over time allows your sustain and armor reduction to create a sustainable survival pattern.
Spirit Visage completes your basic setup against magic damage. At this point, you’re tanky enough to engage onto their carries while dealing enough damage to threaten them.
These four items cost approximately 13,500 gold, which you typically complete around 25-30 minutes if you’re playing reasonably well. After this point, your sixth item choice determines whether you’re utility-focused or further increasing your damage.
Why are these specific items optimal? Because each one synergizes with your kit in meaningful ways. Sundered Sky applies to your spirit’s attack, meaning you get double value from the passive. Black Cleaver shreds armor on everything you hit, and your tentacles hit often. Sterak’s Gage’s shield scales with your health, making it better the more health you purchase. Death’s Dance converts burst into manageable damage. Spirit Visage boosts your inherent sustain.
This core build approach works in approximately 85% of games. The remaining 15% require specific adjustments based on unusual enemy compositions.
Illaoi Situational Items
Understanding when to deviate shows maturity as a player. Not every game requires the standard build path.
Against five-man AD compositions, Randuin’s Omen becomes mandatory over Spirit Visage. The armor and critical strike reduction make you functional against their damage.
Against full AP teams, prioritizing magic resist earlier might mean purchasing Kaenic Rookern as your fourth item instead of waiting for Spirit Visage.
Against extreme healing teams, Chempunk Chainsword becomes your third item, sacrificing tankiness for grievous wounds application.
When ahead by 3+ kills, purchasing Maw of Malmortius provides burst resistance and damage simultaneously. The offensive stats give your damage output an additional spike.
Against kitable compositions, Frozen Heart’s attack speed reduction helps your team control fights. The armor is secondary to the enemy attack speed reduction.
In Aram mode specifically, Hollow Radiance becomes significantly more valuable due to the aura effect applying to your entire team. It’s underutilized in this game mode.
Against champions with projectiles, Hollow Radiance becomes situationally valuable for protecting your backline indirectly.
The key principle: if you’re struggling against one aspect of their team, sacrifice something from your core build to address that problem. A flexible player who adapts wins more games than someone locked into one path.
Illaoi Matchups and Counter Build
Different opponents require different approaches. Your itemization should reflect the specific challenges you face.
Against Darius, prioritize armor early since his bleeding and damage are primarily physical. Plated Steelcaps before your first item helps immensely. After that, follow your standard build but consider rushing Black Cleaver second since his ultimate executes low-health targets.
Against Gwen, this matchup requires careful spacing. Her abilities shred armor, meaning you need to itemize defensively earlier. Spirit Visage might come second instead of fourth.
Against Teemo, Magic Resist becomes crucial from your very first back. Spectre’s Cowl into Kaenic Rookern prevents his dot damage from cooking you over time.
Against Sett, this represents a relatively even matchup if you play properly. His execute is limited by your health, meaning stacking health early prevents him from one-shotting you.
Against Ornn, his upgrades make items expensive. Consider rushing Black Cleaver before Sundered Sky since his passive doesn’t affect the item upgrade anyway.
Against Tryndamere, this becomes a pure AD lane. Plated Steelcaps into Randuin’s Omen with early Black Cleaver creates a wall he can’t penetrate.
Against Yasuo, his armor penetration forces you to build health over pure armor. Sundered Sky into health items works better than stacking resistance.
Against Aatrox, this represents a skill matchup. If you play it right, your tankiness and healing overwhelm his burst. Standard build works fine here.
The principle remains: identify what damage type is threatening you most, then build defensively while maintaining your damage output through your standard itemization.
Best Matchups for Illaoi Build
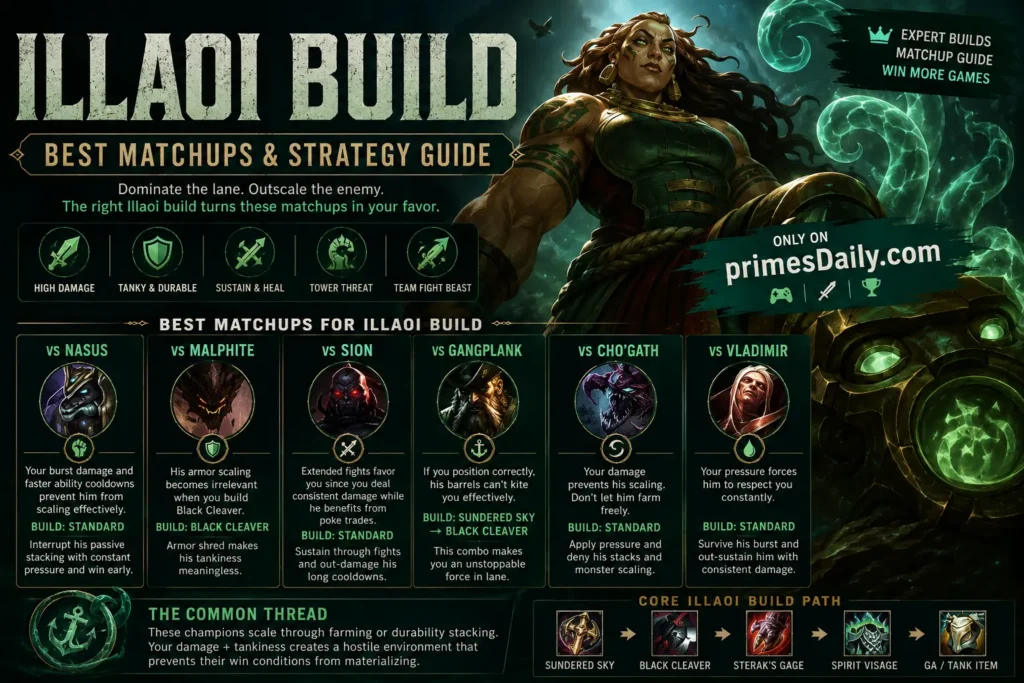
Certain matchups become significantly easier with proper itemization. Understanding these favorable scenarios helps you secure victories through smart play.
Against Nasus, your burst damage and faster ability cooldowns prevent him from scaling effectively. Standard build works perfectly since you can interrupt his passive stacking through constant pressure.
Against Malphite, his armor scaling becomes irrelevant when you build Black Cleaver. Your armor shred makes his tankiness meaningless.
Against Sion, extended fights favor you since you deal consistent damage while he benefits from poke trades. Your standard build is perfect for this matchup.
Against Gangplank, if you position correctly, his barrels can’t kite you effectively. Sundered Sky into Black Cleaver transforms you into an unstoppable force.
Against Cho’Gath, your damage prevents his scaling. Building standard items gives you enough damage to prevent him from farming freely.
Against Vladimir, your pressure forces him to respect you constantly. Standard items provide enough tankiness to survive his burst while dealing consistent damage.
The common thread: these champions scale through farming or durability stacking. Your itemization strategy of damage plus tankiness creates a hostile environment that prevents their win conditions from materializing.
Worst Matchups for Illaoi Build
Some matchups are naturally difficult and require itemization adjustments to overcome.
Against Vayne, her true damage penetrates your resistances. Building health becomes more valuable than armor. Sundered Sky into Sterak’s Gage provides the durability needed.
Against Fiora, her parry blocks your abilities. Standard build still works, but you need to play around her cooldowns rather than relying on raw stats.
Against Camille, her true damage and mobility make dueling difficult. Building health and early Sterak’s Gage helps you survive her burst.
Against Mordekaiser, his ability to isolate you in his realm is devastating. Quicksilver Sash might need to be purchased early in extreme situations.
Against Gnar, his kiting and poke prevent you from engaging. Speeding up your Sundered Sky completion and building movement speed helps.
Against Kayle, her late-game scaling is concerning. Pressuring her aggressively early with standard items prevents her from reaching her win condition.
The lesson: even difficult matchups become manageable with proper itemization and game understanding. Adjust your path based on the enemy champion while maintaining your core strategy.
Illaoi Tips and Tricks
Understanding mechanics beyond itemization elevates your play significantly. Many players overlook these details, but they separate good players from great ones.
Your test of spirit ability on enemy champions spawns a spirit for seven seconds. During this window, you deal massive damage to the enemy if you hit them with your basic attacks. Itemizing for consistent basic attack damage makes this ability more impactful. Sundered Sky and Black Cleaver both provide attack damage, making your poke trading devastating.
Your tentacle spawns follow specific patterns. When you successfully land your E ability on an enemy, all tentacles within a large radius slam that location simultaneously. This means your first item purchase should enable these combos. Sundered Sky applies to tentacle attacks, meaning your first item literally doubles your poke damage against enemies with the spirit effect active.
Your ultimate ability spawns multiple tentacles and reduces your cooldowns. Combined with ability haste from items like Sundered Sky, your abilities come off cooldown quickly enough to maintain pressure.
Position carefully in fights. Your effective range is shorter than most champions, forcing you to build items that compensate. Sterak’s Gage’s shield keeps you alive as you approach enemy carries.
Your healing is exceptionally high against multiple enemies. When you damage multiple targets simultaneously, your health regenerates substantially. Items like Death’s Dance combine with this mechanic to make you nearly immortal in teamfights.
Your tentacle attacks count for ability-based effects. Items like Black Cleaver apply their passive through tentacle attacks, meaning you affect the entire enemy team through your AoE tentacle slams.
Mana management is crucial early game. Purchasing items with mana like Muramana as a sixth item extends your laning phase indefinitely if you’re farming well.
Your movement speed is relatively low naturally, which is why Black Cleaver’s movement speed passive becomes valuable. Combined with proper itemization, you solve your kiting problems while increasing your damage output.
Illaoi Combos and Build Synergy
Understanding ability combinations shows how itemization enables your kit.
Your primary combo involves landing your E ability on an enemy champion, then basic attacking them while the spirit exists. This spirit takes damage based on your attack damage and provides healing based on damage dealt. Sundered Sky and Black Cleaver make this combo deal devastating amounts of damage.
Your secondary combo uses your W ability in rapid succession. This dash-enhanced basic attack applies on-hit effects. Items like Black Cleaver shred armor on-hit, meaning rapid W casts amplify this effect exponentially. Ability haste from Sundered Sky lowers the cooldown substantially.
Your ultimate combo involves using your R ability to generate tentacles, then positioning to hit multiple enemies simultaneously with tentacle slams. This is where Sterak’s Gage’s survivability becomes crucial—you need to stay alive long enough to land these high-impact slams.
Your poke combo uses your basic attacks against enemies with the spirit effect. Sundered Sky doubles this damage, creating massive poke patterns that enemies struggle to survive. This is why rushing Sundered Sky first is optimal—it’s the single item that creates the largest damage spike.
Your teamfight combo involves entering fights when enemies are grouped, landing tentacle slams on multiple targets simultaneously, then surviving through your high health pool and Sterak’s Gage shield. Black Cleaver’s armor shred ensures your damage carries through to their tankier members.
Your sustain combo uses Death’s Dance to convert burst into manageable damage over time, then relies on your inherent healing to sustain through the extended window. This is why Death’s Dance comes after your tankiness items—you need the health pool first to make the damage conversion meaningful.
Your late-game combo uses your ability haste from items to keep abilities off cooldown, maintaining tentacle presence throughout fights. Spirit Visage increases your healing, making you progressively harder to kill as the game extends.
Understanding these combos shows how each item purchase enables specific fight patterns. Your itemization isn’t arbitrary—it’s carefully constructed to enable these high-impact ability combinations.
For the latest, updated, and unique information, visit Cowboy Outfit.
Illaoi Summoner Spells
Choosing your summoner spells affects itemization decisions and vice versa.
Teleport is the standard choice for top lane. It lets you pressure the map while maintaining your lane priority. This spell doesn’t directly interact with items, but it determines how aggressively you can play.
Flash remains essential for survivability. Combined with Sterak’s Gage and your high health pool, it provides an escape mechanism when positioned incorrectly.
Ignite creates a different playstyle. Instead of maintaining lane presence, you’re looking for all-in kill patterns. This playstyle pairs well with early health stacking through Doran’s Blade and rushing Sundered Sky for damage.
Smite is occasionally taken in jungle variations of this champion. Building slightly more tankiness becomes important when you’re not getting toplayer gold and experience.
Your summoner choice doesn’t fundamentally change your itemization strategy, but it does determine when you apply that strategy. Teleport players farm more patiently, while Ignite players look for earlier kill windows.
Illaoi Skill Order
Your ability leveling determines when your itemization pays off.
Level Q (your primary ability) first since it provides your main source of damage and wave clear. Combined with Sundered Sky, this maxed ability becomes your primary damage source.
Level E second for consistency. As you build Black Cleaver and Sundered Sky, this ability’s damage increases exponentially.
Level W last since it scales with attack damage and provides the least impact early. However, in mid-game teamfights where your attack speed is high, this ability’s rapid cooldown becomes devastating.
Your ultimate should always be leveled whenever available at levels 6, 11, and 16. Each rank increases the number of tentacles spawned and reduces your cooldowns.
This standard leveling pattern works across all matchups. Occasionally, maxing W early is viable if you’re focused on burst trading patterns, but generally, the Q-E-W order is optimal.
Top Players Illaoi Build
Professional players and high-elo streamers have established certain itemization trends that prove consistently effective.
Most professional players rushing Sundered Sky as their first item demonstrates this item’s overwhelming power. Rarely do you see players deviate from this choice in high-elo games.
The second item split between Black Cleaver and Divine Sunderer shows flexibility based on enemy composition. Against high armor stacking, Divine Sunderer’s % health penetration becomes attractive. Against normal comps, Black Cleaver’s armor shred is superior.
Most professional players complete Sterak’s Gage as their third item without deviation. The shield and tankiness enable the engagement patterns required for consistent teamfight presence.
Death’s Dance as a fourth item is almost universal among professional players. The damage conversion mechanic is too valuable for staying alive during extended fights.
Spirit Visage for magic resist appears in approximately 80% of high-elo games. The healing increase is difficult to pass up when building defensively.
These patterns weren’t established through randomness—they emerged through countless hours of data proving these items are objectively better than alternatives.
Illaoi Team Synergies
Building for your team composition improves your overall game impact beyond personal stats.
When your team has multiple damage sources, prioritizing tankiness through items like Sterak’s Gage and Spirit Visage ensures you can initiate teamfights without dying instantly. Your role becomes absorbing enemy resources.
When your team lacks damage, building slightly more damage-focused through earlier Black Cleaver or Divine Sunderer acquisition becomes necessary. You can’t rely on teammates to secure kills.
When your team has no crowd control, purchasing Frozen Heart as your sixth item provides attack speed reduction, functioning as pseudo-CC. This helps control enemy engage patterns.
When your team has excessive crowd control, you can afford to skip some tankiness items and focus purely on damage since you’re often protected by your team.
When your team fights multiple times quickly (fast tempo), Death’s Dance becomes even more valuable since the damage conversion window lets you survive multiple successive fights.
When your team scales into late-game, building slightly more tankiness ensures you stay alive long enough to reach those win conditions. Spirit Visage becomes higher priority.
Your build should never be entirely isolated. Understanding your role within the team composition shows maturity in itemization decision-making.
Why Sundered Sky is Best for Illaoi Build
This item deserves individual explanation due to its overwhelming power.
Sundered Sky provides attack damage, ability haste, and health in quantities that are exceptional for the cost. No other first item provides this much value for 3100 gold.
The passive applies to your tentacle attacks. This means every tentacle slam against multiple enemies applies the effect multiple times. Against groups of three or more enemies, this item literally quadruples your damage against poke patterns.
The damage is amplified when you land your E ability on enemy champions. This spirit counts as an enemy for the passive application, meaning every basic attack against someone with the spirit effect active procs Sundered Sky’s damage twice—once on your basic attack and once on the spirit.
The active slow isn’t your primary source of value, but it helps ensure your basic attacks land. In kiting patterns, this extra slow helps you maintain attack range.
The ability haste reduces your ultimate cooldown significantly. At max cooldown reduction, your ultimate comes off cooldown faster than its duration, meaning you maintain permanent tentacle presence.
This item is so powerful that professional players build it in nearly 95% of games. Only against extreme tank-stacking compositions do professionals consider alternatives.
Illaoi Build Mistakes to Avoid
Even experienced players make errors that cost them game impact.
Rushing Iceborn Gauntlet as a first item is a common mistake. The armor helps survive, but the Sheen effect doesn’t interact with tentacle damage, making it an inefficient damage item. Sundered Sky provides superior value.
Building pure tankiness without damage is another error. You need consistent damage output to threaten enemies. Pure tank items leave you useless when teamfights start.
Purchasing too much armor against mixed damage teams is wasteful. Diversifying your resistances through armor, magic resist, and health is optimal for all-purpose defense.
Upgrading boots too early (before your second major item) delays your power spike unnecessarily. Two basic items beat three boots items in power level.
Delaying Black Cleaver when their team is health-stacking shows poor game reading. Armor reduction becomes exponentially valuable against health stackers.
Purchasing grievous wounds items when unnecessary wastes precious itemization slots. Most games don’t require Chempunk Chainsword—only when facing extreme healing compositions.
Building full damage items when behind shows poor game understanding. Falling behind demands tankiness, not aggressive itemization.
These mistakes are common among lower-elo players but disappear as players understand itemization principles deeper.
Illaoi Build for Different Ranks
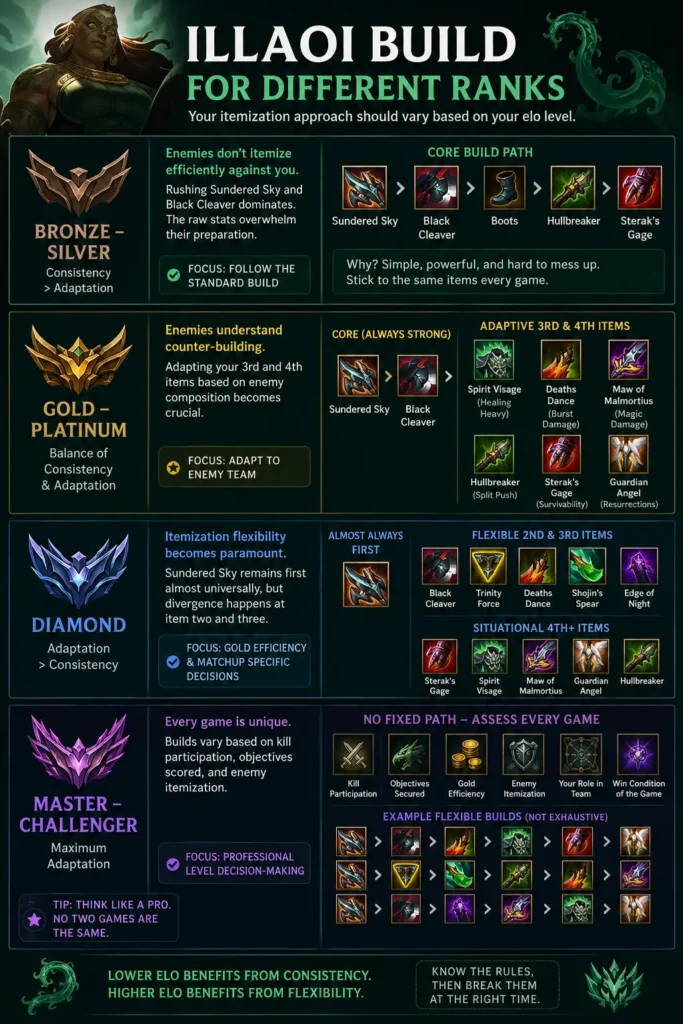
Your itemization approach should vary based on your elo level.
In Bronze through Silver, rushing Sundered Sky and Black Cleaver dominates since enemies don’t itemize efficiently against you. The raw stats overwhelm their preparation.
In Gold through Platinum, your itemization becomes more important since enemies understand counter-building. Adapting your third and fourth items based on enemy composition becomes crucial.
In Diamond, itemization flexibility becomes paramount. The best Diamond players shift their paths based on gold efficiency and matchup-specific factors. Sundered Sky remains first almost universally, but divergence happens at item two and three.
In Master and Challenger, itemization varies game-to-game based on kill participation, objectives scored, and enemy itemization. Professional-level decision-making shows that no two games are entirely identical.
Your elo determines how strictly you should follow the standard build versus how much you should adapt. Lower elo benefits from consistency, while higher elo benefits from flexibility.
Illaoi Related Champions
If you enjoy this champion’s playstyle, certain other champions share similar mechanics.
Sion shares the durability and AoE damage patterns. His itemization strategies overlap significantly with Sundered Sky and Black Cleaver being optimal first items.
Mordekaiser provides similar tankiness through health stacking and ability-based combat. Black Cleaver and Spirit Visage work excellently on him as well.
Malphite offers tanky initiation with different itemization patterns. Though his build paths diverge, the core principle of tankiness enabling damage remains identical.
Cho’Gath provides AoE teamfight impact and sustained damage. Health scaling means Sundered Sky becomes valuable, though his itemization deviates more substantially.
Tahm Kench shares the close-range combat and healing patterns. Though primarily support, his tankiness itemization has overlapping elements.
Poppy provides tankiness and crowd control similar to damage patterns. Black Cleaver and Sterak’s Gage work excellently on her as well.
Understanding these alternative champions provides flexibility when your primary choice is banned or becomes unfavorable.
FAQs
What’s the most important item to buy first?
Sundered Sky is overwhelmingly the best first item choice. It provides everything you need—damage for offensive pressure, health for durability, and ability haste for cooldown reduction. This item creates the largest single power spike available to you. Professional players and high-elo streamers build this item in over 95% of their games, which demonstrates its superiority.
Should I build differently in Aram matches?
Yes, Aram requires itemization adjustments since the game mode emphasizes teamfight mechanics over laning. Consider Hollow Radiance earlier since the aura benefits your entire team. Sundered Sky remains optimal, but your remaining items might shift toward utility-focused purchases. The shorter game length means you complete fewer items, so prioritizing cost-efficient options becomes crucial.
What items work against heavy heal compositions?
Chempunk Chainsword becomes mandatory as an early third or fourth item when facing multiple healing sources. Grievous wounds application reduces enemy sustain by 40%, effectively negating their healing advantage. This is one of the few situations where you’d skip Death’s Dance in favor of applying grievous wounds earlier.
Is Iceborn Gauntlet ever worth building?
Iceborn Gauntlet is rarely optimal. While armor helps survival and the Sheen effect enhances your W ability, Sundered Sky provides superior value through tentacle synergy and more efficient stat allocation. The item doesn’t interact meaningfully with your entire kit, making it inefficient compared to alternatives.
How do I itemize against burst-heavy teams?
Prioritize Sterak’s Gage earlier when facing burst compositions. The shield directly counters multiple simultaneous damage sources. Death’s Dance should also come earlier since the damage conversion extends your survival window. Consider Maw of Malmortius if they’re specifically AP-heavy.
When should I build magic resist items?
Spirit Visage should come whenever their team has more than two AP sources. Kaenic Rookern becomes valuable if they’re also heavy healers. If they have mostly physical damage, delay these items in favor of armor and health stacking.
What’s the best way to handle matchups with extreme armor stackers?
Black Cleaver becomes your second priority item, and Divine Sunderer might replace Sundered Sky in extreme situations. Armor penetration becomes more valuable than raw damage when enemies are specifically building armor. Occasionally purchasing Lord Dominik’s Regards as a fourth or fifth item becomes optimal against extreme resistance stacking.
Is attack speed an important stat for this champion?
Attack speed increases your basic attack frequency, enabling faster W ability cooldown resets and more consistent poke damage. While not a primary stat you should prioritize, it has value through ability haste and standard attack speed boots. Building primarily for health and damage still provides sufficient attack speed through natural champion scaling.
How many items should I have by 25 minutes?
A typical game involves completing three items by 25 minutes if you’re playing well. This usually means Sundered Sky, Black Cleaver, and Sterak’s Gage. If you’re ahead, you might have completed Death’s Dance as well. Being behind might mean only two completed items plus partial progress on a third.
Should I ever skip Sundered Sky?
Skipping Sundered Sky is almost never correct. Only in extreme situations where you’re getting rushed down by all-in damage would you consider rushing armor or magic resist first. Professional statistics show that Sundered Sky first wins games at higher rates than any alternative approach.
What role does gold efficiency play in item choices?
Gold efficiency matters more at higher elo levels. Some items provide better stat values per 100 gold than others. Sundered Sky is exceptionally efficient, costing only 3100 gold while providing stats equivalent to 3400+ gold worth of value. This efficiency advantage is part of why it’s universally optimal.
How does itemization change in late-game teamfights?
Your sixth item choice becomes crucial for late-game impact. If the game extends to 35+ minutes, your options include Adaptive Force for damage, utility items like Frozen Heart for CC, or additional tankiness through defensive purchases. Late-game builds should adapt based on what your team needs to close the game.
Conclusion
Mastering itemization for this top lane menace requires understanding both general principles and specific game contexts. The foundation—Sundered Sky into Black Cleaver into Sterak’s Gage—remains optimal in the vast majority of situations. Building this core creates a champion that’s simultaneously tanky and dangerous, able to initiate teamfights while staying alive long enough to make impact.
Your journey doesn’t stop with memorizing a build order. True mastery comes from understanding why these items work together and when to deviate based on enemy composition. Every game presents unique challenges requiring flexible thinking. Some games demand early magic resist through Kaenic Rookern, others require armor through Randuin’s Omen, and occasionally you’ll need to prioritize grievous wounds through Chempunk Chainsword.
The meta continues evolving in 2026, but the principles underlying optimal itemization remain constant. Choose items that synergize with your abilities, adapt your path based on opponents, and maintain consistent damage output while staying alive. Players who master these fundamentals consistently outperform those who simply follow guides without understanding the reasoning.
Remember that itemization is only half the equation. Understanding your power spikes, knowing when to engage, and positioning correctly during fights matter equally. An optimal build in the hands of a player who doesn’t understand fight mechanics loses to a standard build piloted by someone with superior game knowledge.
Start with the standard path, practice until it becomes automatic, then gradually incorporate flexibility as your understanding deepens. This progression creates consistent improvement that compounds over time. Within a few weeks of focused practice, you’ll find yourself naturally adapting your itemization to match opponents, creating advantages that carry games.
The path to mastery is incremental. Each game teaches lessons about what works and what doesn’t. Pay attention to when your items feel powerful and when they feel weak. Notice which enemies itemize effectively against you and which don’t. This pattern recognition, combined with consistent application of fundamental principles, elevates your play from good to exceptional.
For the latest, updated, and unique information, visit ARC Raiders Events.